> ## Documentation Index
> Fetch the complete documentation index at: https://docs.bloom.diy/llms.txt
> Use this file to discover all available pages before exploring further.
# Deploying Your App
> Export your code and publish to the App Store and Google Play.
Once you've built and tested your app in Bloom, you have two options for getting it into users' hands:
1. **Instant sharing** (covered in [Instant Sharing](/instant-sharing)) — Share immediately with links and QR codes
2. **App Store publishing** (this guide) — Deploy to official app stores for public distribution
This guide covers **publishing to the iOS App Store and Google Play Store** for permanent, discoverable app listings.
**Not sure which you need?** If you're testing, demoing, or building an internal tool, [instant sharing](/instant-sharing) is faster and easier. If you want public distribution, monetization, or app store credibility, follow this guide.
## Why publish to app stores?
Users can find your app by searching app stores. You appear in categories, featured lists, and recommendations.
Official app store listings build trust with users. Many people prefer downloading from stores they know.
Sell your app, offer in-app purchases, or use subscription models through app store payment systems.
Full push notification support (iOS requires App Store distribution for reliable push).
Access to app store analytics, user reviews, and ratings to improve your product.
Essential for businesses, brands, or apps serving large audiences.
## Requirements for publishing
### Plan requirements
**Code export** is available on Starter plans and above.
Export your full Expo + Convex project as a ZIP
Deploy to any hosting platform
Publish to app stores
[View pricing →](/pricing-and-credits)
**GitHub sync** is available on Premium plans and above.
Two-way sync with GitHub
Automatic code pushes
Integrate with CI/CD pipelines
Use GitHub Actions for automated builds
[View pricing →](/pricing-and-credits)
### Developer accounts
To publish to app stores, you'll need:
**Cost:** \$99/year
**Required for:** Publishing to the iOS App Store
**Sign up:** [developer.apple.com/programs](https://developer.apple.com/programs/)
**What you get:**
* Ability to submit apps to App Store
* Access to App Store Connect
* TestFlight for beta testing
* App analytics and sales reports
* Certificate and provisioning profile management
You can build and test iOS apps without this account using Bloom's instant sharing. You only need it when you're ready to publish officially.
**Cost:** \$25 one-time fee
**Required for:** Publishing to Google Play Store
**Sign up:** [play.google.com/console](https://play.google.com/console/)
**What you get:**
* Ability to publish apps to Play Store
* Access to Play Console
* Internal testing and beta tracks
* App analytics and user feedback
* Revenue reports (for paid apps)
Much cheaper than Apple's yearly fee—just a one-time \$25 payment and you can publish unlimited apps.
## Exporting your code
### Option 1: Download as ZIP (Starter+)
In the top right corner of the editor, click the **Download Code** button.
 Bloom bundles your current project version and downloads it as a ZIP file.
The export includes:
* Full Expo project (frontend)
* Complete Convex deployment (backend)
* Configuration files
* Package dependencies
* Environment setup instructions
Unzip the file on your computer. You'll see:
```
my-app/
├── expo/ # Your frontend code
├── convex/ # Your backend functions
├── package.json # Dependencies
├── README.md # Setup instructions
└── ...
```
Your exported code is a standard Expo + Convex project. You can run it locally, deploy it to your own infrastructure, or publish it to app stores.
### Option 2: GitHub Sync (Premium+)
In the top right corner of the editor, click the **GitHub Sync** button.
Bloom bundles your current project version and downloads it as a ZIP file.
The export includes:
* Full Expo project (frontend)
* Complete Convex deployment (backend)
* Configuration files
* Package dependencies
* Environment setup instructions
Unzip the file on your computer. You'll see:
```
my-app/
├── expo/ # Your frontend code
├── convex/ # Your backend functions
├── package.json # Dependencies
├── README.md # Setup instructions
└── ...
```
Your exported code is a standard Expo + Convex project. You can run it locally, deploy it to your own infrastructure, or publish it to app stores.
### Option 2: GitHub Sync (Premium+)
In the top right corner of the editor, click the **GitHub Sync** button.
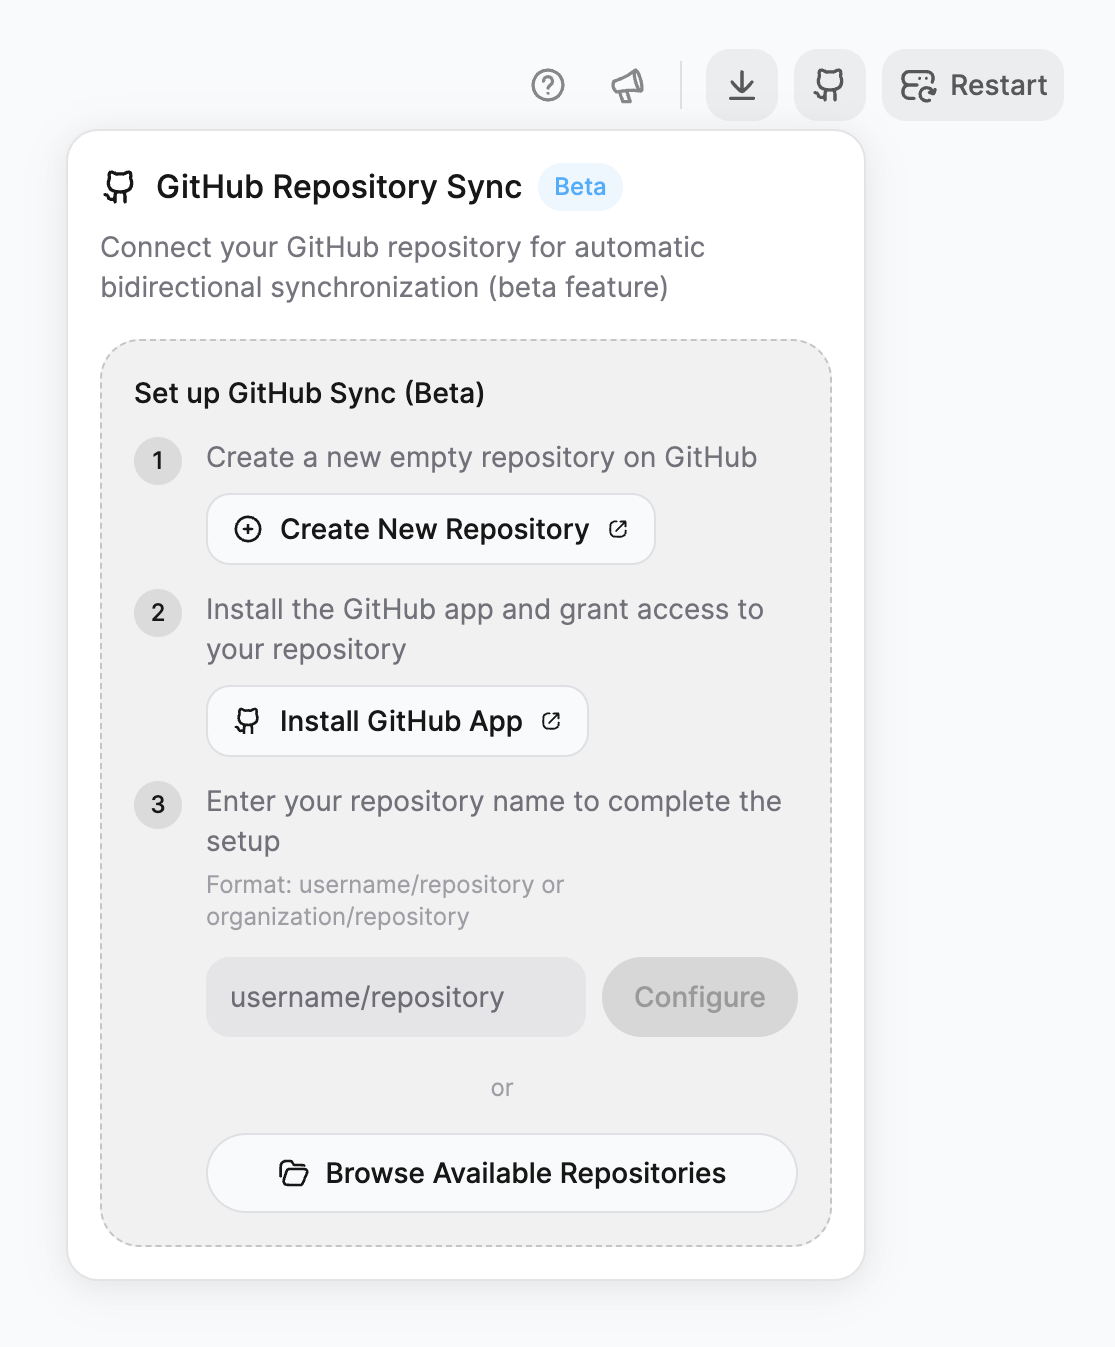 Click **Create New Repository** to open GitHub directly. The repository must be empty for the initial sync to work correctly.
Click **Install GitHub App** to install the Bloom GitHub App and grant it access to your repository. You can grant access to all repositories or only select repositories.
Enter your repository name in the format `username/repository` or `organization/repository`, then click **Configure**.
You can also click **Browse Available Repositories** to select from repositories you've already granted access to.
With your code in GitHub, you can set up automated workflows:
* **GitHub Actions** for automated builds
* **Expo EAS** for app store submissions
* **Automated testing** on every commit
* **Deployment pipelines** for staging and production
GitHub Sync is ideal for teams or developers who want version control and automated deployment workflows.
## Publishing to iOS App Store
Before submitting, ensure you have:
App name and description
App icon (1024x1024px)
Screenshots for required device sizes
Privacy policy URL (if collecting user data)
App category selection
Age rating information
1. Log in to [App Store Connect](https://appstoreconnect.apple.com)
2. Click **My Apps** → **+** → **New App**
3. Fill in app information:
* Platform: iOS
* Name
* Primary language
* Bundle ID (must match your Expo app)
* SKU (internal identifier)
Your **Bundle ID** is in your Expo configuration. Find it in `app.json` or `app.config.js` in your exported code.
Bloom apps are built with Expo, which means you'll use **Expo Application Services (EAS)** for building and submission.
```bash theme={null}
npm install -g eas-cli
```
```bash theme={null}
eas login
```
```bash theme={null}
eas build:configure
```
This creates `eas.json` with build profiles.
```bash theme={null}
eas build --platform ios
```
EAS builds your app in the cloud and provides a download link.
Follow Expo's [App Store submission guide](https://docs.expo.dev/submit/ios/) for detailed instructions.
Once your build completes:
1. Download the `.ipa` file from EAS
2. Upload to App Store Connect via Transporter or Xcode
3. Add screenshots, descriptions, and metadata
4. Submit for review
Apple review typically takes 1-3 days but can be longer. Monitor your submission status in App Store Connect.
Apple reviews your app for:
* Compliance with App Store guidelines
* Privacy policy requirements
* Functionality and crashes
* Accurate metadata
If approved, your app goes live automatically (or on your scheduled release date).
If rejected, you'll receive feedback and can resubmit after making changes.
Expo's comprehensive guide to App Store submission
## Publishing to Google Play Store
Before submitting, ensure you have:
App name and short description (80 chars)
Full description (4000 chars)
App icon (512x512px)
Feature graphic (1024x500px)
Screenshots (at least 2 per device type)
Privacy policy URL (if collecting user data)
Content rating questionnaire completed
1. Log in to [Google Play Console](https://play.google.com/console)
2. Click **Create app**
3. Fill in basic information:
* App name
* Default language
* App or game
* Free or paid
4. Accept terms and create app
```bash theme={null}
eas build:configure
```
```bash theme={null}
eas build --platform android
```
Choose **apk** for testing or **aab** (Android App Bundle) for Play Store submission.
For Play Store, always use **aab** format—it's required and provides smaller download sizes.
1. In Play Console, go to **Production** → **Create new release**
2. Upload your `.aab` file from EAS
3. Add release notes
4. Review and roll out
You can also use internal testing or closed testing tracks before going to production.
Fill out all required fields in Play Console:
* App details (name, description, category)
* Graphics (icon, feature graphic, screenshots)
* Categorization (app category, tags)
* Contact details (email, website, privacy policy)
* Content rating
* Target audience and content
Play Store requires more detailed content ratings than iOS. Complete the questionnaire carefully.
Once all required fields are complete:
1. Click **Review release**
2. Check for any errors or warnings
3. Click **Start rollout to Production**
Google's review is typically faster than Apple's (often within hours to 1 day).
Expo's comprehensive guide to Play Store submission
## Managing your backend
After publishing, your Convex backend continues to run and scale automatically. You can:
Keep using Bloom's [Backend Dashboard](/backend-dashboard) to monitor health, view logs, and manage data.
Your Convex deployment is accessible at the URL shown in your Backend Dashboard settings. Open in a new tab for full Convex dashboard access.
Your Convex deployment URL remains the same after publishing. Your published app connects to the same backend you use in Bloom.
## Updating your published app
### For apps exported as ZIP:
Continue editing your app in Bloom to add features, fix bugs, or update UI.
Download a fresh ZIP export when you're ready to publish an update.
* Update version number in `app.json`
* Build with EAS: `eas build --platform ios|android`
* Submit new build to app stores
### For apps with GitHub sync:
Your GitHub repo updates as you work in Bloom.
If you've set up GitHub Actions or automated builds, they run automatically on new commits.
Automated pipelines can submit directly to app stores, or you can trigger manually.
**Over-the-air updates:** With Expo's EAS Update, you can push JavaScript changes to users instantly without resubmitting to app stores. Native changes still require new builds.
## Common publishing questions
* **Apple App Store:** 1-3 days on average (sometimes longer)
* **Google Play Store:** Hours to 1 day typically
First submissions often take longer as reviewers are more thorough.
Both stores will provide reasons for rejection. Common issues:
* Missing privacy policy
* Crashes or bugs
* Metadata that doesn't match functionality
* Violations of content guidelines
Fix the issues and resubmit. You can appeal if you believe the rejection is incorrect.
**Native changes:** Yes, anything that modifies native code, dependencies, or app configuration requires a new build and submission.
**JavaScript changes:** No. Use Expo's EAS Update to push JS changes instantly without rebuilding.
Yes! Both platforms offer testing options:
* **iOS:** Use TestFlight for beta testing
* **Android:** Use internal testing or closed testing tracks
You can also continue using Bloom's [**instant sharing**](/instant-sharing) for quick testing.
After exporting:
1. Configure environment variables in your build profiles (EAS)
2. Keep sensitive keys in `.env` files (never commit to GitHub)
3. Use Expo's secure storage for production credentials
Your Convex backend URL is automatically included in the build.
* **Apple:** 30% commission on paid apps and in-app purchases (15% for small businesses earning under \$1M/year)
* **Google:** 15% commission on first \$1M, then 30% after
Free apps with no in-app purchases have no commissions.
## What's next?
Track performance and health as users start using your published app.
Debug issues and monitor user activity in production.
Learn advanced build and deployment workflows with Expo.
Understand how your backend scales and how to optimize for production.
Contact Bloom support for assistance with app store submission and deployment.
Click **Create New Repository** to open GitHub directly. The repository must be empty for the initial sync to work correctly.
Click **Install GitHub App** to install the Bloom GitHub App and grant it access to your repository. You can grant access to all repositories or only select repositories.
Enter your repository name in the format `username/repository` or `organization/repository`, then click **Configure**.
You can also click **Browse Available Repositories** to select from repositories you've already granted access to.
With your code in GitHub, you can set up automated workflows:
* **GitHub Actions** for automated builds
* **Expo EAS** for app store submissions
* **Automated testing** on every commit
* **Deployment pipelines** for staging and production
GitHub Sync is ideal for teams or developers who want version control and automated deployment workflows.
## Publishing to iOS App Store
Before submitting, ensure you have:
App name and description
App icon (1024x1024px)
Screenshots for required device sizes
Privacy policy URL (if collecting user data)
App category selection
Age rating information
1. Log in to [App Store Connect](https://appstoreconnect.apple.com)
2. Click **My Apps** → **+** → **New App**
3. Fill in app information:
* Platform: iOS
* Name
* Primary language
* Bundle ID (must match your Expo app)
* SKU (internal identifier)
Your **Bundle ID** is in your Expo configuration. Find it in `app.json` or `app.config.js` in your exported code.
Bloom apps are built with Expo, which means you'll use **Expo Application Services (EAS)** for building and submission.
```bash theme={null}
npm install -g eas-cli
```
```bash theme={null}
eas login
```
```bash theme={null}
eas build:configure
```
This creates `eas.json` with build profiles.
```bash theme={null}
eas build --platform ios
```
EAS builds your app in the cloud and provides a download link.
Follow Expo's [App Store submission guide](https://docs.expo.dev/submit/ios/) for detailed instructions.
Once your build completes:
1. Download the `.ipa` file from EAS
2. Upload to App Store Connect via Transporter or Xcode
3. Add screenshots, descriptions, and metadata
4. Submit for review
Apple review typically takes 1-3 days but can be longer. Monitor your submission status in App Store Connect.
Apple reviews your app for:
* Compliance with App Store guidelines
* Privacy policy requirements
* Functionality and crashes
* Accurate metadata
If approved, your app goes live automatically (or on your scheduled release date).
If rejected, you'll receive feedback and can resubmit after making changes.
Expo's comprehensive guide to App Store submission
## Publishing to Google Play Store
Before submitting, ensure you have:
App name and short description (80 chars)
Full description (4000 chars)
App icon (512x512px)
Feature graphic (1024x500px)
Screenshots (at least 2 per device type)
Privacy policy URL (if collecting user data)
Content rating questionnaire completed
1. Log in to [Google Play Console](https://play.google.com/console)
2. Click **Create app**
3. Fill in basic information:
* App name
* Default language
* App or game
* Free or paid
4. Accept terms and create app
```bash theme={null}
eas build:configure
```
```bash theme={null}
eas build --platform android
```
Choose **apk** for testing or **aab** (Android App Bundle) for Play Store submission.
For Play Store, always use **aab** format—it's required and provides smaller download sizes.
1. In Play Console, go to **Production** → **Create new release**
2. Upload your `.aab` file from EAS
3. Add release notes
4. Review and roll out
You can also use internal testing or closed testing tracks before going to production.
Fill out all required fields in Play Console:
* App details (name, description, category)
* Graphics (icon, feature graphic, screenshots)
* Categorization (app category, tags)
* Contact details (email, website, privacy policy)
* Content rating
* Target audience and content
Play Store requires more detailed content ratings than iOS. Complete the questionnaire carefully.
Once all required fields are complete:
1. Click **Review release**
2. Check for any errors or warnings
3. Click **Start rollout to Production**
Google's review is typically faster than Apple's (often within hours to 1 day).
Expo's comprehensive guide to Play Store submission
## Managing your backend
After publishing, your Convex backend continues to run and scale automatically. You can:
Keep using Bloom's [Backend Dashboard](/backend-dashboard) to monitor health, view logs, and manage data.
Your Convex deployment is accessible at the URL shown in your Backend Dashboard settings. Open in a new tab for full Convex dashboard access.
Your Convex deployment URL remains the same after publishing. Your published app connects to the same backend you use in Bloom.
## Updating your published app
### For apps exported as ZIP:
Continue editing your app in Bloom to add features, fix bugs, or update UI.
Download a fresh ZIP export when you're ready to publish an update.
* Update version number in `app.json`
* Build with EAS: `eas build --platform ios|android`
* Submit new build to app stores
### For apps with GitHub sync:
Your GitHub repo updates as you work in Bloom.
If you've set up GitHub Actions or automated builds, they run automatically on new commits.
Automated pipelines can submit directly to app stores, or you can trigger manually.
**Over-the-air updates:** With Expo's EAS Update, you can push JavaScript changes to users instantly without resubmitting to app stores. Native changes still require new builds.
## Common publishing questions
* **Apple App Store:** 1-3 days on average (sometimes longer)
* **Google Play Store:** Hours to 1 day typically
First submissions often take longer as reviewers are more thorough.
Both stores will provide reasons for rejection. Common issues:
* Missing privacy policy
* Crashes or bugs
* Metadata that doesn't match functionality
* Violations of content guidelines
Fix the issues and resubmit. You can appeal if you believe the rejection is incorrect.
**Native changes:** Yes, anything that modifies native code, dependencies, or app configuration requires a new build and submission.
**JavaScript changes:** No. Use Expo's EAS Update to push JS changes instantly without rebuilding.
Yes! Both platforms offer testing options:
* **iOS:** Use TestFlight for beta testing
* **Android:** Use internal testing or closed testing tracks
You can also continue using Bloom's [**instant sharing**](/instant-sharing) for quick testing.
After exporting:
1. Configure environment variables in your build profiles (EAS)
2. Keep sensitive keys in `.env` files (never commit to GitHub)
3. Use Expo's secure storage for production credentials
Your Convex backend URL is automatically included in the build.
* **Apple:** 30% commission on paid apps and in-app purchases (15% for small businesses earning under \$1M/year)
* **Google:** 15% commission on first \$1M, then 30% after
Free apps with no in-app purchases have no commissions.
## What's next?
Track performance and health as users start using your published app.
Debug issues and monitor user activity in production.
Learn advanced build and deployment workflows with Expo.
Understand how your backend scales and how to optimize for production.
Contact Bloom support for assistance with app store submission and deployment.