> ## Documentation Index
> Fetch the complete documentation index at: https://docs.bloom.diy/llms.txt
> Use this file to discover all available pages before exploring further.
# GitHub Sync
> Connect your Bloom app to GitHub for bidirectional code synchronization.
GitHub Sync connects your Bloom app to a GitHub repository, enabling bidirectional synchronization. Changes you make in Bloom automatically push to GitHub, and changes pushed to GitHub sync back to Bloom.
GitHub Sync is currently in **beta** and available on **Premium plans and above**.
## Setting Up GitHub Sync
In the top right corner of the editor, click the **GitHub Sync** button.
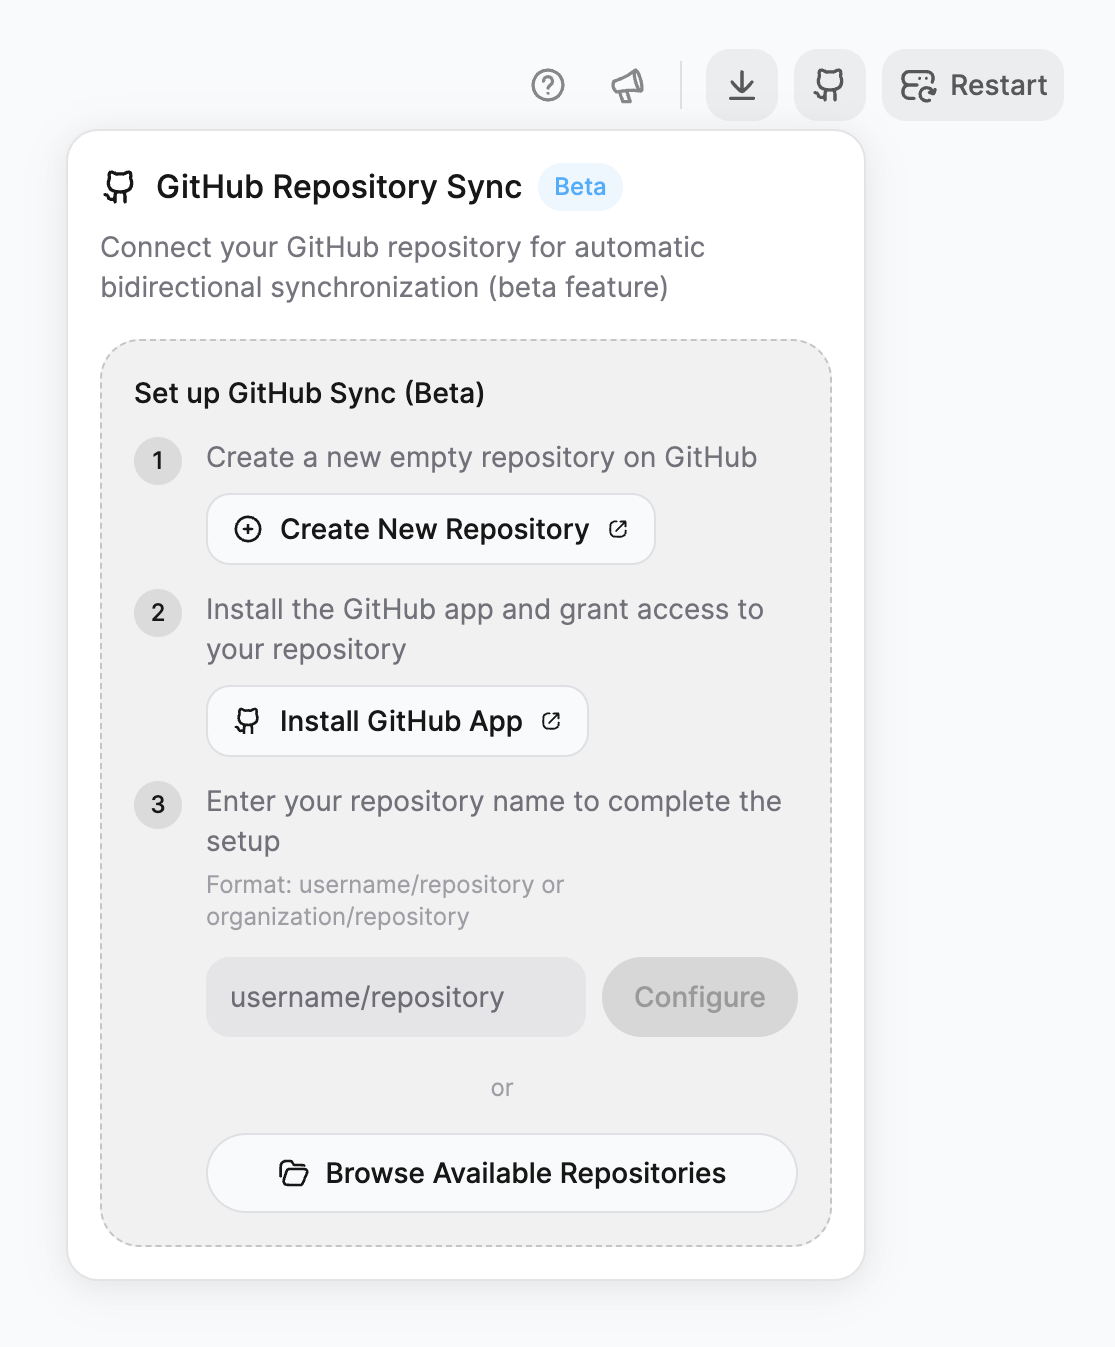 Click **Create New Repository** to open GitHub directly. The repository must be empty for the initial sync to work correctly.
Click **Install GitHub App** to install the Bloom GitHub App and grant it access to your repository. You can grant access to all repositories or only select repositories.
Enter your repository name in the format `username/repository` or `organization/repository`, then click **Configure**.
You can also click **Browse Available Repositories** to select from repositories you've already granted access to.
Once connected, your app's code will sync to the repository automatically.
## How Sync Works
GitHub Sync maintains bidirectional synchronization between Bloom and your repository.
**Changes made in Bloom push to GitHub automatically.**
When you generate new features or make any changes in Bloom, those changes are committed and pushed to your connected repository.
* Each generation creates a new commit
* Commits include descriptive messages
* Your full commit history is preserved
**Changes pushed to GitHub sync back to Bloom.**
When you push commits to your repository (from your local IDE, GitHub's web editor, or any Git client), those changes automatically sync back to your Bloom app.
* Pull the latest changes by refreshing your Bloom workspace
* Merge conflicts are handled automatically when possible
* You'll be notified if manual resolution is needed
## Use Cases
Use VS Code, Cursor, or any editor you prefer. Push changes to GitHub and they'll appear in Bloom.
Multiple team members can work on the same app using standard Git workflows.
Full Git history lets you track changes, revert mistakes, and understand how your app evolved.
Connect your repo to GitHub Actions or other CI/CD tools for automated testing and deployment.
## Working Locally
Once your app is synced to GitHub, you can clone it and run it locally.
### Prerequisites
* **Bun** (JavaScript runtime and package manager)
* **Convex CLI** (for running the backend)
### Running Your App
```bash theme={null}
git clone https://github.com/your-username/your-app.git
cd your-app
bun install
```
Copy the example environment file and fill in your Convex deployment details:
```bash theme={null}
cp .env.example .env
```
You can find your Convex deployment URL in your [**Convex dashboard**](https://dashboard.convex.dev).
```bash theme={null}
bun run dev
```
This starts both the Expo frontend and Convex backend.
See [**App Structure**](/app-structure) to understand how your project files are organized.
## Requirements and Limitations
GitHub Sync is available on **Premium plans and above** (\$50/month).
[**View pricing →**](https://bloom.diy/pricing)
* The repository must be **empty** when you first connect
* You must have **write access** to the repository
* The Bloom GitHub App must be installed and authorized
GitHub Sync is currently in beta. You may encounter:
* Occasional sync delays
* Edge cases with complex merge conflicts
Report any issues to [**support@bloom.diy**](mailto:support@bloom.diy) or in our [**Discord**](https://discord.com/invite/ZC3zgARtUY).
## What's Next?
Understand how your synced codebase is organized
Monitor your app's performance and database
Click **Create New Repository** to open GitHub directly. The repository must be empty for the initial sync to work correctly.
Click **Install GitHub App** to install the Bloom GitHub App and grant it access to your repository. You can grant access to all repositories or only select repositories.
Enter your repository name in the format `username/repository` or `organization/repository`, then click **Configure**.
You can also click **Browse Available Repositories** to select from repositories you've already granted access to.
Once connected, your app's code will sync to the repository automatically.
## How Sync Works
GitHub Sync maintains bidirectional synchronization between Bloom and your repository.
**Changes made in Bloom push to GitHub automatically.**
When you generate new features or make any changes in Bloom, those changes are committed and pushed to your connected repository.
* Each generation creates a new commit
* Commits include descriptive messages
* Your full commit history is preserved
**Changes pushed to GitHub sync back to Bloom.**
When you push commits to your repository (from your local IDE, GitHub's web editor, or any Git client), those changes automatically sync back to your Bloom app.
* Pull the latest changes by refreshing your Bloom workspace
* Merge conflicts are handled automatically when possible
* You'll be notified if manual resolution is needed
## Use Cases
Use VS Code, Cursor, or any editor you prefer. Push changes to GitHub and they'll appear in Bloom.
Multiple team members can work on the same app using standard Git workflows.
Full Git history lets you track changes, revert mistakes, and understand how your app evolved.
Connect your repo to GitHub Actions or other CI/CD tools for automated testing and deployment.
## Working Locally
Once your app is synced to GitHub, you can clone it and run it locally.
### Prerequisites
* **Bun** (JavaScript runtime and package manager)
* **Convex CLI** (for running the backend)
### Running Your App
```bash theme={null}
git clone https://github.com/your-username/your-app.git
cd your-app
bun install
```
Copy the example environment file and fill in your Convex deployment details:
```bash theme={null}
cp .env.example .env
```
You can find your Convex deployment URL in your [**Convex dashboard**](https://dashboard.convex.dev).
```bash theme={null}
bun run dev
```
This starts both the Expo frontend and Convex backend.
See [**App Structure**](/app-structure) to understand how your project files are organized.
## Requirements and Limitations
GitHub Sync is available on **Premium plans and above** (\$50/month).
[**View pricing →**](https://bloom.diy/pricing)
* The repository must be **empty** when you first connect
* You must have **write access** to the repository
* The Bloom GitHub App must be installed and authorized
GitHub Sync is currently in beta. You may encounter:
* Occasional sync delays
* Edge cases with complex merge conflicts
Report any issues to [**support@bloom.diy**](mailto:support@bloom.diy) or in our [**Discord**](https://discord.com/invite/ZC3zgARtUY).
## What's Next?
Understand how your synced codebase is organized
Monitor your app's performance and database